Hello..
I made a new sweater based on Burda Easy A/W 2013 pattern 6B :)
This sweater is one of the garments that I plan for MAGAM November challenge, the plan was posted here in my facebook page.
The weather is still hot but I think it will be going down soon, so once again I am wearing it just to take pictures :) I love how the sweater turned out, it is very cosy, soft and warm at the same time. Besides that, I love the colours. Grey and black matched well with each other. What do you think?

Materials:
I used 2 yards of ponte de roma knit in grey colour and cotton ribbed knit for the bands.
Three black buttons, two snap fasteners, fusible interfacing and thread.


Pattern:
Burda Easy Autumn Winter 2013, sweater 6 B size 34/36. The magazine didn't come with printed pattern, so I have to draft it following the instruction. It was an easy drafting, I am done in less than 30 minutes.


Sewing process:
All the first process shown here in the pictures,


Here are the closer looks of the finished buttons and snaps, outside and inside,


And the pictures of the sweater, front and back views


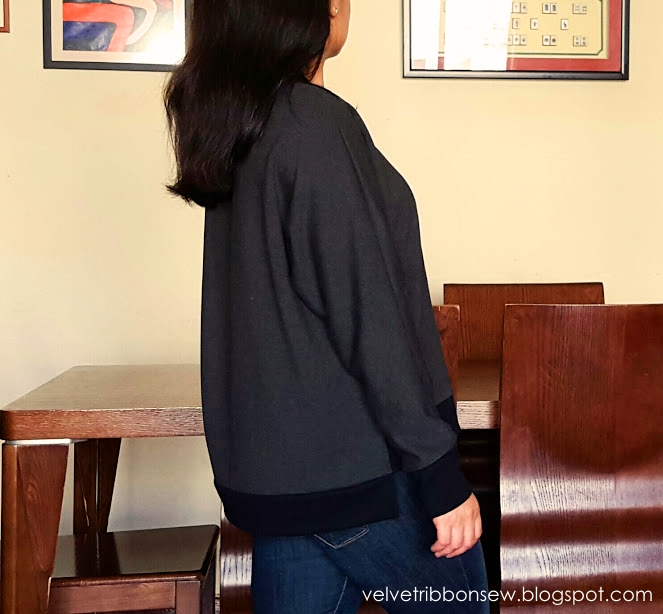
Also more pictures of me wearing my new sweater, front - back and side views


I made a new sweater based on Burda Easy A/W 2013 pattern 6B :)
This sweater is one of the garments that I plan for MAGAM November challenge, the plan was posted here in my facebook page.
The weather is still hot but I think it will be going down soon, so once again I am wearing it just to take pictures :) I love how the sweater turned out, it is very cosy, soft and warm at the same time. Besides that, I love the colours. Grey and black matched well with each other. What do you think?

Materials:
I used 2 yards of ponte de roma knit in grey colour and cotton ribbed knit for the bands.
Three black buttons, two snap fasteners, fusible interfacing and thread.


Pattern:
Burda Easy Autumn Winter 2013, sweater 6 B size 34/36. The magazine didn't come with printed pattern, so I have to draft it following the instruction. It was an easy drafting, I am done in less than 30 minutes.


Sewing process:
- After I drafted the pattern, I transferred to the fabric and cut. As shown in the first picture at the top left, I had two pieces of fabric already cut - front and back.
- Then I laid my sweater right sides together, pin and stitch at the left side.
- I sew the neck band by folded the band and stitch it along the neckline right sides together and top stitch using twin needle.
- After that, I worked on the shoulder fastening. I attached the button band piece on the left front shoulder, right side of the band facing the wrong side of the shoulder. Clip the seam allowance.
- Turned the band to the right side of the shoulder and edge stitched.
- Then I stitched the underlap by folded the piece and attached it on the left back shoulder, right side of the band facing the wrong side of the shoulder.
- Turned the band to the right side.
- Placed the button band piece on the top of underlap and pinned.
- Then pinned and stitched the shoulder area to the sleeve right sides together.
All the first process shown here in the pictures,

- After I am done the fist process, I stitched in the end the button band piece and the underlap
- And then, I worked on the sleeve bands. I stitched the side seam to the sleeve right sides together. Folded the band and stitched it to the lower edge of the sleeve right side of the sleeve facing the band.
- Turned the band to the outside and you can see the result in the picture below, left side at the bottom.
- After I am done the sleeve band, I worked on the front hem band. I folded the band and attached it to the hem, right side of the hem facing the band.
- Turned the band to the outside/right side
- Then I worked on the back hem. Folded the back hem band and stitched in the both sides open edges wrong sides together. Turned the hem inside out and attached to the hem. Then turned the hem to the outside/right side as well.
- Pinned and stitched both hems right sides together.
- Turned the sweater inside out. The final result of the hem was unusual but really nice because of the extra long back hem. It looks like high-low hem to me :)
- And the last work, sew the buttons and snaps. I replaced the button holes with the snaps and I only use two snaps instead of three.
All the second process shown here in the pictures below,

Here are the closer looks of the finished buttons and snaps, outside and inside,


And the pictures of the sweater, front and back views


Also more pictures of me wearing my new sweater, front - back and side views


 |
| Magam Facebook Group |
Happy sewing!
Follow me on Bloglovin'
I too think grey and black look lovely together and you created a great sweater! Thanks for sharing the process!
ReplyDeleteThank you, Katharina ☺
DeleteWhat a great sweater! I need one just like yours... today is chilly outside! How come you didn't have a printed pattern? Well, obviously you didn't need one, great job!
ReplyDeleteThank you, Raquel. The magazine didn't come with printed pattern but I have to self-draft it according to the instruction and measurement. Lucky that the instruction was very clear and easy to follow :)
DeleteI especially like the different lengths of the hem! The sweater looks very modern and suits you absolutely great.
ReplyDeleteThank you, Kathrin. I like the different lengths of the hem as well :)
DeleteThis is a lovely sweater Hana with some cute details. Thank you for sharing the process in such detail. Beautiful work.
ReplyDeleteThank you, Jean. I think I need to sew one more to cover the hole in my winter wardrobe :)
DeleteWhat a lovely cozy sweater! Looks perfect for those cool winter days & nights. Always enjoy learning about your construction process and really appreciate all the photos too! :)
ReplyDeleteThank you, Lisa 😊
DeleteWonderful blog and so detailed! I love your new sweater, especially the hems.
ReplyDeleteThank you, Mary 😊 I love the hem as well.
DeleteWhat a nice warm garment - and it is very smart with the contrast black with grey. I love the snap opening - a nice sporty touch. Your photos are lovely and detailed, which is helpful to so many people. I hope you enjoy wearing this soon :)
ReplyDeleteThank you, Sarah Liz :)
DeleteGreat sweater Hana!!
ReplyDeleteThank you, Margo :)
DeleteI love your sweater.. The different hem lines are pretty too. Looks pretty on you. Hope it cools off soon, so you can wear it.
ReplyDeleteThank you, Judy. It is going to be cool tonight, yay!! :)
DeleteThis looks great on you - the high low hem, the contrast bands and the snaps on the shoulder. Great job!
ReplyDelete