Hello fellow sewists, I was checking my last post here in the blog and realised that I didn't make update for more than one and half months. I was busy with a lot of things but still making stuff/garments and most of them I published in my Instagram. As things are back to normal this month and kid is back to school, I have a little free time to write a post and reading your posts too 😍
My latest makes are kimono top and slim pants, both are my entry to #magamsewalong hosted by lovely Sarah Liz. This outfit is my August garment, I'm late but better late than never 😊
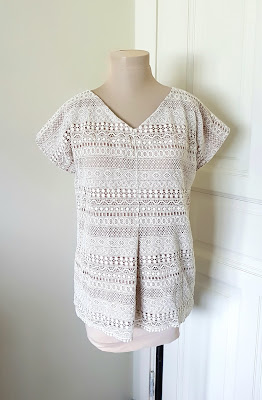
For the top, I used 1.40 yards (barely enough to make a top) of lace cotton polyester in off-white and pinkies rayon as lining from stash and pattern was from Japanese sewing book that shown in the cover but I made it shorter according to my preference. I made two dresses from this pattern some months back, you can see them here if you are interested.
For the pants, I used medium weight knit jersey in wine colour that I bought recently in the local shop and pattern was Simplicity 1314 Cynthia Rowley size 10 that I made slimmer. This pants is my third version and you can see the first version here and second version here.
The process of making the top started with cut the lace fabric that I barely have enough. Even so
I made a point of matching the lines in the centre front and back. I was sad seeing the terrible matching at both sides but... 😓
After cutting both lace and rayon as lining, I basted them together by hand, as shown in the picture with black thread. I took one afternoon to baste, then sewing it in the next day. It was time consuming but I love doing this to avoid uneven finished garment.
The finished neckline on the original pattern was with neckband sewed along the neckline, but I used facing and finished with top-stitched 1 cm. I did this because the lace was a little bulky at the neckline and the top-stitch made it less.
I love this kimono pattern, because it has centre front pleat and back pleats which added more volume on the bodice and made it less boxy. Also, I decided to make a short sleeve version due limited amount of fabric and reduced 2.5 cm of the the armhole width. I love the result because the sleeves look less square. 😍
The lining pieces attached and sewed together with the lace except in the hemline. I cut the lining 4 cm shorter at the hem, I did narrow hem 0.75 cm first and sewed both sides together with the lace.
About the slim pants, the original pattern was a little bit loose on me (I did in the first version). As this time I want a better fit, I reduced 1.5 cm in the outer sides (front and back) and left the inner sides as the original pattern.
This pants were easy to sew, it comes in three pieces of patterns (front, back and waistband which finished with elastic inserted inside). No pockets or front fly but might be better to add pockets one day I make this pants again.
The rest of the pants sewed with my overlocker machine and twin needle for the hem.
I always love to spread the elastic more in the back than front, as shown below. I did this to create less bulky at the front.
That's it for today lovelies, hope you have a nice sewing weekend and I promise to update this blog more often 💗


What a lovely outfit combination!!!
ReplyDeleteThank you Vanessa 💕
DeleteThe top is so pretty. I love the lining colour. Great outfit.
ReplyDeleteThank you 💕😊
DeleteOh, I so like the pleats in that lace top Hana, they are perfection!
ReplyDeleteThank you Sue, I love the pleats too so much 💕
DeleteWow, this is fantastic Hana!
ReplyDeleteThank you Mary 💕
DeleteLove everything about this pretty outfit!! Such a pretty top using the lace. Super fit on the pants!! Great job!!! :)
ReplyDeleteThank you so much Lisa 💕
DeleteBeautiful
ReplyDeleteThank you Judy :)x
DeleteWow, this is fantastic Hana!
ReplyDelete