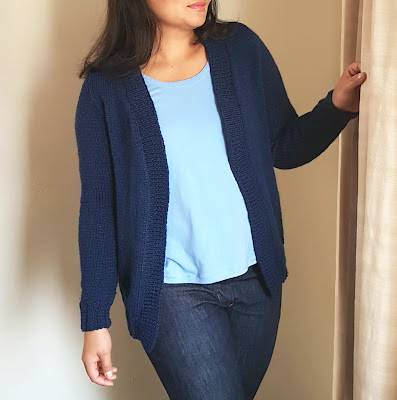
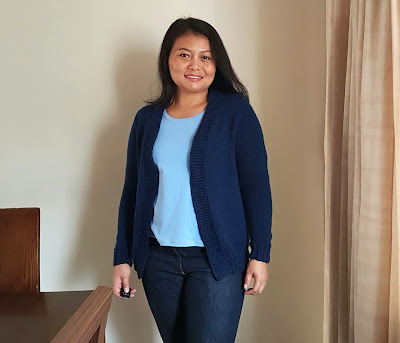
I am participating some challenges in Instagram this year, one of them is #2018makenine hosted by Rochelle New and glad I finished my first garment that I worked since January. For the pattern, I decided to chose free pattern - Estuary v-neck cardigan size 36 that I found in Ravelry. The cardigan has a simple stockinette stitch for the bodice and sleeve, 2x2 rib for the sleeve and hem bands and 1x1 rib for front/neckline band.
I skip the colour block style and use one colour only because I have enough amount of yarns in my stash and as promised I wouldn't buy new yarns this year except when I am on travel 😁
If you are following me on Instagram, you must have seen the knitting progress for this cardigan. I used wool yarn in deep blue colour, 3.75 mm and 4.5 mm/80 cm circular needles.
I decided to work one row (front-back-front) together instead of 2 pieces of front and 1 piece of back and glad it saved a lot of time, especially for my slow level.
The process started with usual manner, CO followed by 2x2 rib stitch 2 inches and stockinette stitch until the armhole. Then I used 3 ball of yarns worked together to shape the armholes. After the armholes shaped and knit more rows for the shoulder and bind-off, I sew the shoulder front and back together and knit the sleeves at once in the round.
After the sleeves done, I sew them to the armholes and worked on 1x1 rib stitch for the front/neckline band until measured 2 inches, bind-off on ribbing.
I decided to skip the buttons and buttonholes, I like the look of this cardigan without buttons besides I am still a little bit scared to try knitting the buttonholes 😟
I was wearing the whole me-made garments, the v-neck cardigan - short sleeve Plantain Deer and Doe tee in light blue and modified Burdastyle jeans.
And here is my 2018 Make Nine plans, you can read each detail on my IG post. I did the bomber jacket last month as trial and will make one more this month and happy to say that I am in progress of making the scarf (middle right).
Hopefully that I can make all of these by the end of this year. 💪
Happy knitting and sewing weekend to all of you! 💗
I skip the colour block style and use one colour only because I have enough amount of yarns in my stash and as promised I wouldn't buy new yarns this year except when I am on travel 😁
If you are following me on Instagram, you must have seen the knitting progress for this cardigan. I used wool yarn in deep blue colour, 3.75 mm and 4.5 mm/80 cm circular needles.
I decided to work one row (front-back-front) together instead of 2 pieces of front and 1 piece of back and glad it saved a lot of time, especially for my slow level.
The process started with usual manner, CO followed by 2x2 rib stitch 2 inches and stockinette stitch until the armhole. Then I used 3 ball of yarns worked together to shape the armholes. After the armholes shaped and knit more rows for the shoulder and bind-off, I sew the shoulder front and back together and knit the sleeves at once in the round.
After the sleeves done, I sew them to the armholes and worked on 1x1 rib stitch for the front/neckline band until measured 2 inches, bind-off on ribbing.
I decided to skip the buttons and buttonholes, I like the look of this cardigan without buttons besides I am still a little bit scared to try knitting the buttonholes 😟
After all the work for two and half months, I like how this cardigan turned out except the sleeves that are little tight, I wish I know before that I should add more stitches for ease/comfort but anyway I still can wear and proud of it. Not now in 28 degrees Celsius but next winter and after I block it 😊 I really hope it becomes softer afterwards.
I was wearing the whole me-made garments, the v-neck cardigan - short sleeve Plantain Deer and Doe tee in light blue and modified Burdastyle jeans.
And here is my 2018 Make Nine plans, you can read each detail on my IG post. I did the bomber jacket last month as trial and will make one more this month and happy to say that I am in progress of making the scarf (middle right).
Hopefully that I can make all of these by the end of this year. 💪
Happy knitting and sewing weekend to all of you! 💗


great knitted cardi!
ReplyDeleteThank you Ivana.
DeleteYour cardigan looks so beautiful and very well-made.
ReplyDeleteThank you dear friend.
DeleteLove your cardigan..You did a wonderful job. Happy sewing and knitting.
ReplyDeleteThank you Judy, glad you loved it. Happy sewing to you too.
DeleteHana, you have done a beautiful job!! I somehow missed the sewing process on IG, but you make me miss knitting, lol! You are definitely talented!
ReplyDeleteThank you Vanessa, knitting keeps me sane and I am enjoying it a lot.
DeleteI remember when you just started to learn to knit - you have come a long way since then. What a lovely cardigan, you must be very proud of yourself.
ReplyDeleteThank you for kind words, Sarah Liz ❤
DeleteYou make knitting sound, and look!, so easy with knitting such a lovely cardi. The fit is perfect and the color lovely. :)
ReplyDeleteThank you Lisa, I enjoy knitting more and more :)
Delete